Christmas
Christmas Wreath Multi-Colour Stencil Tutorial
Jul
Read on to find out how we spiced up our date cake in this Christmas Wreath Multi-Colour Stencil Tutorial!
Maddy and I really wanted to create a simple yet effective decoration for the top of our Christmas in July cake. This tutorial shows how we used a limited colour palette to create festive fanfare without the fuss. All you’ll need is some cocoa, cinnamon, a little icing sugar and our Christmas Wreath multi-colour stencil!
You will need:
- Our Christmas Wreath multi-colour stencil – available here
(gently washed in warm soapy water and dried thoroughly) - Dutch Cocoa, a good dark one
- Cinnamon
- Icing sugar
- Crispy milk chocolate pearls
- A brush (used only for cake decorating)
- Toothpick
- A cake! We used our Spiced Date Cake, find the recipe here
- Buttercream – use your favourite
- Bling (optional) – we used tiny edible gold stars by Rainbow Dust
Step 1
Frost your cake with buttercream, making certain the top is nice and flat. We put the cake in the fridge to make sure our buttercream was extra firm for stencilling.
Step 2
Select Stencil 2 and position it bang in the centre on top of your cake. Our Spiced Date Cake is 7 inches in diameter which fits the stencil nicely. Make sure the stencil text is right reading (i.e. facing up). For this project we worked from light to dark so there was no need to wash our brush between colours.
Step 3
Use a toothpick to mark where each of the five notches are. Mix a small amount of icing sugar into some cinnamon. You want it lighter in colour than straight cinnamon.
Step 4
Brush this mixture over the stencil. The aim is to build colour rather than dumping a heap of spice onto the stencil and cake. Too much gets messy! Try using a stipple action with your brush. Keep your stencil flat and make certain your brush and dust do not bleed under the stencil. Carefully lift your stencil and place aside. Do not remove the stencil by dragging it off your cake as it WILL smudge!
Step 5
Place Stencil 3 making certain the text is right reading and ALL five notches match your markings. Use straight cinnamon and repeat process in Step 4.
Step 6
Place Stencil 4 making certain the text is right reading and ALL five notches match your markings. Use straight cocoa and repeat process in Step 4.
Step 7
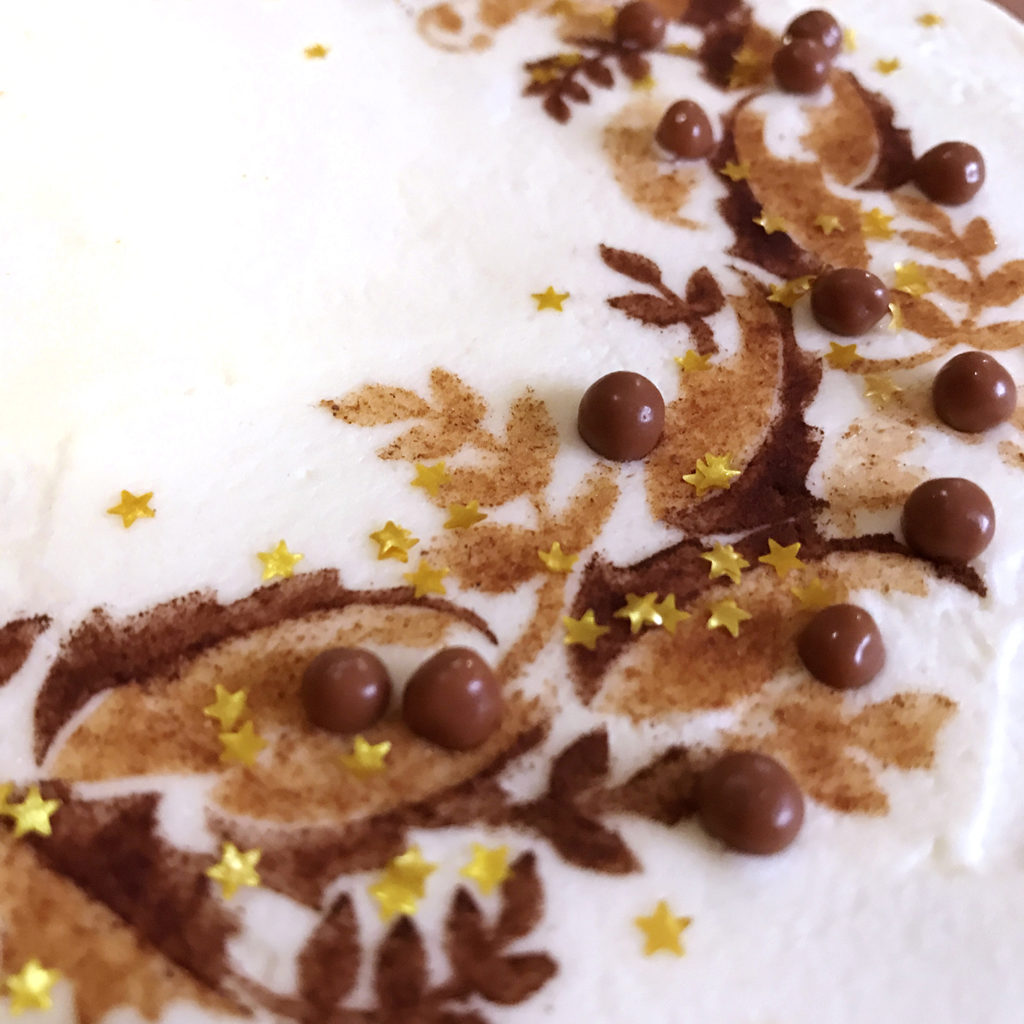
Place Stencil 1 making certain the text is right reading and ALL five notches match your markings. This will help you mark the buttercream to position the crispy milk chocolate pearls. After removing the stencil, place the pearls and give them a little nudge into the buttercream. NOTE: You can delete this step or add more crispy pearls if you prefer.
Step 8
You’re done, but if you fancy a little bling, sprinkle on a few edible shapes like the tiny gold stars we used. Stand back, admire your work and get ready for compliments!

Products featured in this blog

Christmas Wreath Multi-Colour Stencil
Our multi-colour stencils are designed to save you time, give your cakes an exquisite edge and foster your creativity.
WANT MORE?
Sign up to be on THE LIST to receive exclusive access to sales and content.

Pingback: Our Christmas in July Spiced Date Cake | SANDRA DILLON DESIGN