Christmas
Our Christmas in July Spiced Date Cake
Here’s a cake that’s easy to make and decorate – perfect for winter celebrations. Read on to find out how to make our Christmas in July Spiced Date Cake
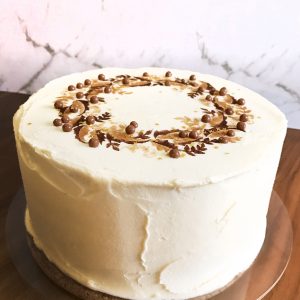
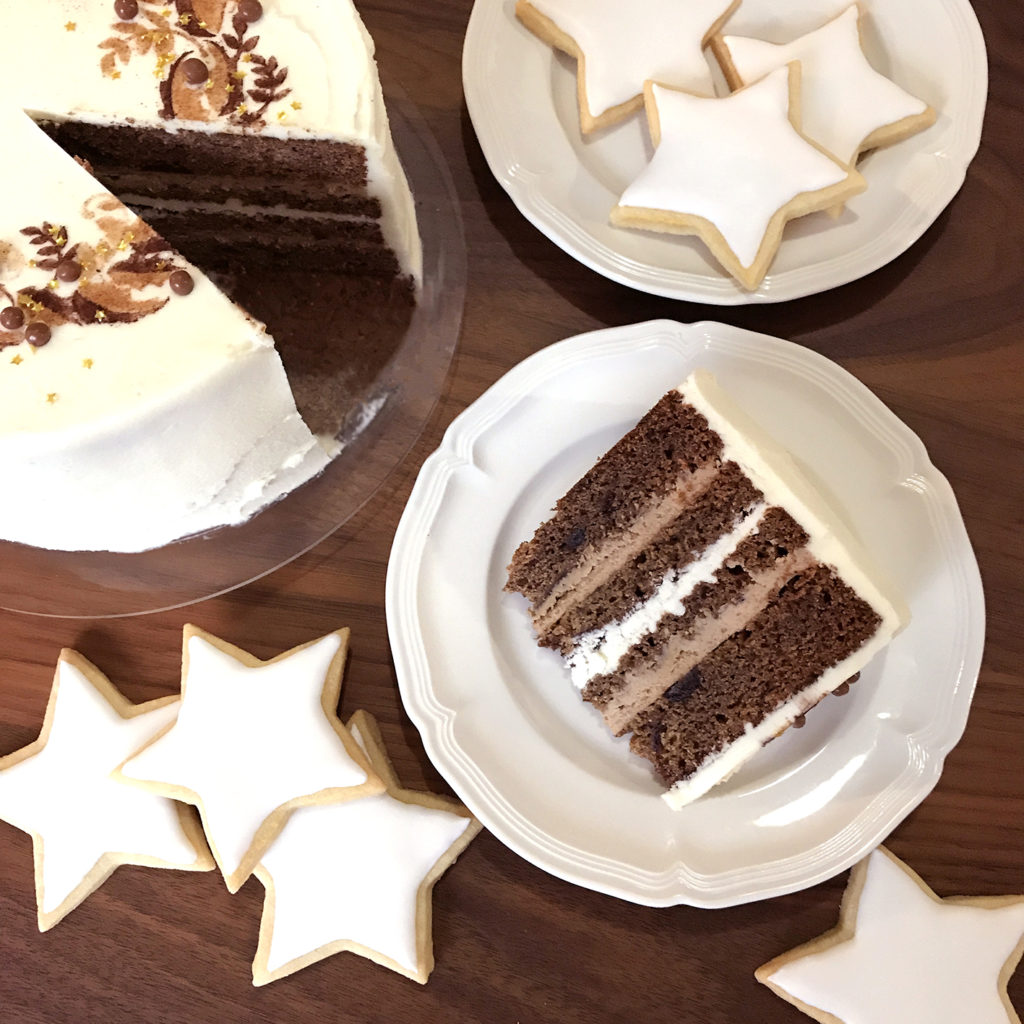
It’s that time of year in the southern hemisphere where we get to pretend Christmas is a wintery affair. Not that most Australians would ever exchange our summer ‘silly season’ for any other month than December, but an excuse to celebrate in winter suits us just fine. Finding the time to cook up a storm may be another matter. This cake is not difficult and can be put together quickly if a little prep is done the night before. For me, Christmas is all about spice. Cinnamon is one of my favourites so this year, Maddy and I, took a well loved date cake recipe and gave it a little twist. The fruit and cinnamon is lifted with fresh lemon zest to offset the punch of dates and spice. On its own, it would suit an afternoon snack of substance but as Christmas is a time of decadence we took the plunge and layered it with a mascarpone cream filling. This cake had to be something any home baker (like me) could muster with supermarket ingredients and limited time. Yet it still had to deliver big flavour and lusciousness. To set it off, Maddy and I really wanted to create a simple yet effective decoration for the top. We used our Christmas Wreath multi-colour stencil with cocoa and cinnamon. A perfect reference to the cake flavours, it also showed how a limited colour palette with basic ingredients can be used simply to create festive fanfare without the fuss. Our tutorial here shows just how simple our multi-colour stencils are to use. Cake recipe adapted from the Australian Woman’s Weekly Home Library Cakes and Slices Cookbook.
Cake Ingredients
- 500g dates – roughly chopped
- 1 cup water
- 1/2 teaspoon bicarbonate of soda
- 185g unsalted butter
- 2/3 cup castor sugar
- 3 eggs – at room temperature
- 2 teaspoons cinnamon
- 2 teaspoons lemon zest
- 1 1/2 cups self-raising flour
- 1/4 cup plain flour
- Butterscotch Snapps (optional)
Filling ingredients
- 250g mascarpone
- 1 tablespoon caramel spread
- 2 teaspoons cinnamon or to taste
- Your preferred buttercream
Method
The night before baking your cake, combine the dates, water and bicarbonate of soda in a glass bowl. Give it a good mix and cover to stand overnight. The next morning, give it another stir to make sure all the dates have been mixed into the liquid to soften. You want them squidgy, almost a puree with a few yielding chunks here and there. When you are ready to bake, set the oven to 190°C or lower for a fan-forced oven. In my case, I have the oven from hell with a fierce fan and a total disregard for accurate temperature control (that’s my story anyway) so if you feel your oven would prefer a different setting, you are most welcome to adjust. Line the bottom and sides of two 7 inch cake tins with baking paper and a light spray of non-stick oil. In your electric stand mixer, cream the butter and sugar until light and fluffy. Add eggs, one at a time and beat until combined. Add half the flours and half the undrained date mixture, along with the lemon zest and cinnamon. Combine on low speed. Scrap down your bowl if necessary. Add the rest of the flour and date mixture and mix again on low to medium speed until well combined but not over-worked. Divide equally into the two pans and spread the tops evenly. Pop them into the oven for 40-45 minutes until done. Yep, the top will spring back a bit and a skewer will come out clean, assuming you haven’t pierced a chunk of date with it. Leave them in the pans for 5 minutes before turning out onto a rack, then inverting each to cool completely. While the cakes are baking, make your buttercream. For the filling combine the mascarpone, cinnamon and caramel spread in a bowl and mix to combine. Adjust flavour to your liking.
To assemble the cake
My cakes had a slight dome so I levelled them by cutting off the top neatly. Each cake was then cut in half horizontally. Moisten each of the four layers by using a pastry brush charged with butterscotch schnapps. This is optional, or you may prefer to use a different complimentary flavour, the choice is yours. Smear a little blob of buttercream on your cake plate or cake board. Place the baked bottom side of one layer on top. The cut side should be up. Spread half of the mascarpone mixture over the cake leaving a little room around the edge. Place on the next layer. Spread some buttercream (more or less as you like) over the cake leaving a little room around the edge. Place on the next layer. Spread the remaining half of the mascarpone mixture over the cake leaving a little room around the edge. Place on the final layer ensuring the baked side is facing up. You are now ready to frost the cake in buttercream. It pays to do a crumb coat first. Let this firm up a bit before adding the final buttercream coat. We left ours rustic. Feel free to go swirly or super smooth on the sides but make sure the top of the cake is flat and relatively smooth if you intend to use a stencil to decorate. Kerrie Wyer does not recommend refrigerating buttercream but (sorry Kerrie) we did pop it into the fridge to keep the mascarpone filling from spoiling. The cake is best brought to room temperature before serving to a hoard of festive feeders.


